Most VDI deployment guides assume one device type per rollout. A real department floor rarely cooperates: a reception desk needs a compact unit under the counter, a row of workstations needs screens of the right size for the task, and a training room needs endpoints that can be reimaged on a schedule. Installing one thin client model everywhere means either over-sizing the small roles or under-sizing the demanding ones. This guide covers a mixed deployment across three roles using three Hotus endpoints: the HCAR5000 MI under the counter and behind the wall, the ST11-J on the standard workstations, and the ST11-U where the bigger screen earns its place. The same thin client VDI endpoint logic works for any mixed floor, from a clinic to a school to a back office.
⚙️ Matching Hardware to Role Before Mounting
A floor with one device type pays for it twice: once when the small roles mount a unit that is larger than the space needs, and again when the screen-heavy roles run on a display that is too small for the work. A reception counter has almost no mounting depth and needs the processing hidden away; a standard workstation needs a screen that fits a desk; a planning or monitoring role needs a larger display for dashboards that never shrink. The mixed fleet matches hardware to role at the point of installation, which is cheaper than matching roles to hardware after the rollout disappoints. The three roles below map cleanly onto the HCAR5000 MI, the ST11-J, and the ST11-U.
📱 Counter Duty: The Compact Unit Out of Sight
The compact role is where the HCAR5000 MI earns its place, because it is a genuine mini PC rather than a tablet with a stand. At a reception counter, install the HCAR5000 MI under the countertop on a VESA bracket or a shelf mount, with the display on the counter and only the cables passing through. The mounting keeps the unit out of sight and out of the way, and it removes the single biggest failure point of a counter deployment, which is an endpoint sitting in the footwell where cables get kicked and dust collects. Give the HCAR5000 MI a power run on its own outlet rather than sharing the counter's socket strip, and leave enough slack in the display cable that the screen can be pulled forward for service without unplugging the unit.
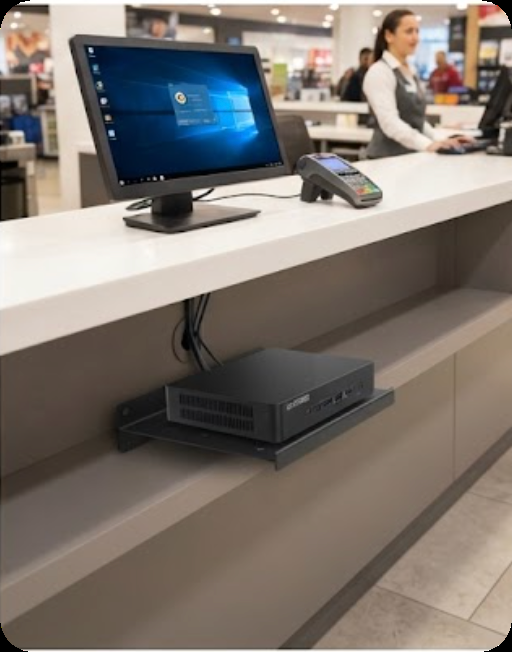
The under-counter mounting above is the installation pattern that keeps the HCAR5000 MI out of the footwell and out of sight: the unit rides on a shelf bracket, the display sits on the counter, and only the cables pass through. A dedicated power run finishes the job.
🖥️ Desk-Height Workstations: The Mid-Size Screen
The standard workstation role is the largest group on most floors, and the ST11-J fits it because its screen size matches the everyday mix of email, forms, and line-of-business apps without taking the whole desk. Install the ST11-J on a desk stand or a wall arm, whichever the workstation layout favors, and set the screen angle so the primary user sees it squarely and a visitor or a camera does not read the screen from the side. Cable the ST11-J through the stand where possible, because a workstation that is used for eight hours will otherwise develop a nest of loose cables around the base. On a floor where workstations are shared between shifts, configure the ST11-J to drop to the login screen at the end of a session rather than resting on the previous user's desktop.
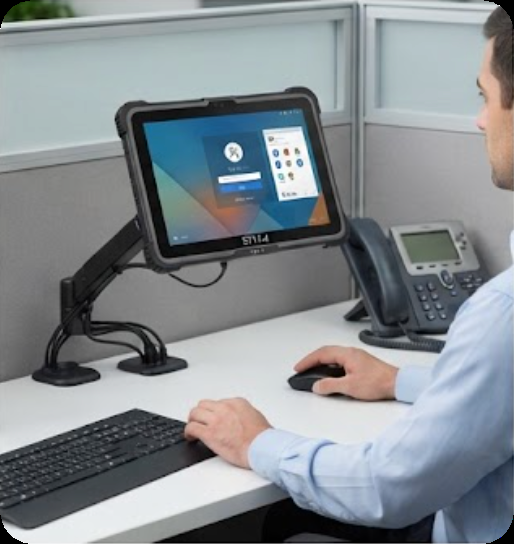
The workstation setup above shows the ST11-J on a desk stand with the cable routed through the stand's channel. The screen angle faces the primary user, and the session drops to login at shift change, which keeps a shared workstation from becoming a shared privacy risk.
🖥️ Screen Angle and Session Hygiene on Shared Desks
Screen angle and session hygiene are the installation details that separate a comfortable floor from a privacy risk. On shared workstations, set the display angle so the current user sees it squarely and a visitor or a camera cannot read it from the side, and configure the endpoint to drop to the login screen at the end of a session rather than resting on the previous user's desktop. On dedicated display roles, lock the larger panel to its application so the screen returns to the dashboard view after idle time instead of wandering back to a desktop. Both habits cost nothing at installation and remove the most common mid-day complaints on a mixed floor.
Dashboards and Detail: The Larger Panel
The screen-heavy role is where the ST11-U earns its place, because some tasks never fit a standard display. A monitoring dashboard, a scheduling board, or a review screen shows more rows and more context on the larger panel, and forcing that role onto a smaller screen costs the user constant scrolling. Install the ST11-U where the dashboard work actually happens, typically on a wall arm or a stand that keeps the larger screen clear of the desk surface. Mount it high enough that a standing user reads it comfortably, and lock the display to the dashboard application if the role is dedicated, so the screen returns to the board view after every idle period instead of wandering back to a desktop.
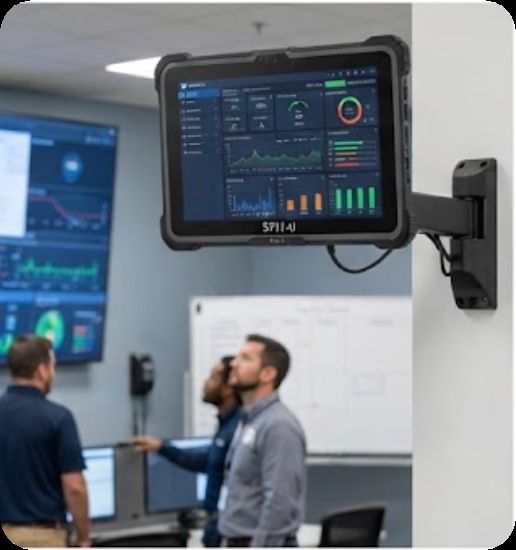
The dashboard mounting above shows the ST11-U where its larger screen matters most: a monitoring board that stays visible to the whole team. Mounted on a wall arm and locked to the dashboard application, the ST11-U turns a workstation into a display role.
Managing All Three Endpoints from One Image
The three device types share one management image, which is what makes a mixed fleet practical instead of exhausting. Provision a single VDI image that the HCAR5000 MI, the ST11-J, and the ST11-U all boot into, and assign device profiles by role rather than by model: the counter profile for the HCAR5000 MI, the workstation profile for the ST11-J, and the display profile for the ST11-U. Confirm that the network ports where each device lands have enough bandwidth for the VDI session, especially in the training or monitoring areas where several sessions start at once. Assign static identities to the fixed devices so the image server addresses the same endpoint every morning, and document the profile map in the handover folder before the first day of use.
| Role | Device | Mounting | Profile |
|---|---|---|---|
| Counter and hidden roles | HCAR5000 MI | Under-counter VESA or shelf | Counter profile, dedicated power |
| Standard workstations | ST11-J | Desk stand or wall arm | Workstation profile, session logout |
| Dashboards and detail | ST11-U | Wall arm, high mount | Display profile, app lock |
The table summarizes the mixed deployment in one view. Each role names its device, its mounting, and its profile, so the installation team can walk the floor and confirm every row before the first workstation goes live.
🔋 Power and Cable Routing per Role
Power and cable routing differ by role, and treating every device the same invites the two classic failures. A counter unit mounted in a footwell dies early because cables get kicked and dust collects, so the compact role needs its own protected outlet and a display cable with enough slack to pull the screen forward for service. A wall-mounted dashboard panel needs its power run routed behind the arm, with the cable exit hidden rather than trailing down the wall. A desk workstation needs its cable routed through the stand channel where one exists. Confirming the routing per role before the first device goes live prevents the rework that otherwise appears during the first week of real use.
💰 Rolling the Deployment Out in Three Passes
Install the mixed floor in three passes rather than all at once, matching the order to the risk. Pass one mounts the HCAR5000 MI roles, because the counter and hidden endpoints are the easiest to verify and the ones that break silently when the mounting is wrong. Pass two adds the ST11-J workstations, which is the largest group and where the profile testing matters most. Pass three finishes with the ST11-U display roles, which are the fewest and the most visible, so they get the last attention after the floor is already stable. Between passes, run a single day of real use on the installed group before starting the next, which keeps a mounting or profile error from multiplying across the whole floor at once. The related thin client VDI installation guide shows the same pass-based method applied to a tablet-only fleet, and the full rugged handheld tablets range carries the stands, arms, and mounts that make each row of the table install cleanly.